
Getting started with Docker and Kubernetes on Windows 10
Getting started with Docker and Kubernetes on Windows can be daunting when you don't know where to begin. And it doesn't help that installing the software isn't exactly a walk in the park. In fact, you should already be a Docker and Kubernetes expert to navigate the options on how to install them. But don't worry! If you're just starting your journey with containers and Kubernetes on Windows this article is for you. You'll learn how to make the right choices when it comes to setting up your development environment on Windows.

Getting started with Docker and Kubernetes on Windows can be daunting when you don't know where to begin.
And it doesn't help that installing the software isn't exactly a walk in the park.
In fact, you should already be a Docker and Kubernetes expert to navigate the options on how to install them.
But don't worry!
If you're just starting your journey with containers and Kubernetes on Windows this article is for you.
You'll learn how to make the right choices when it comes to setting up your development environment on Windows.
Let's start with Docker.
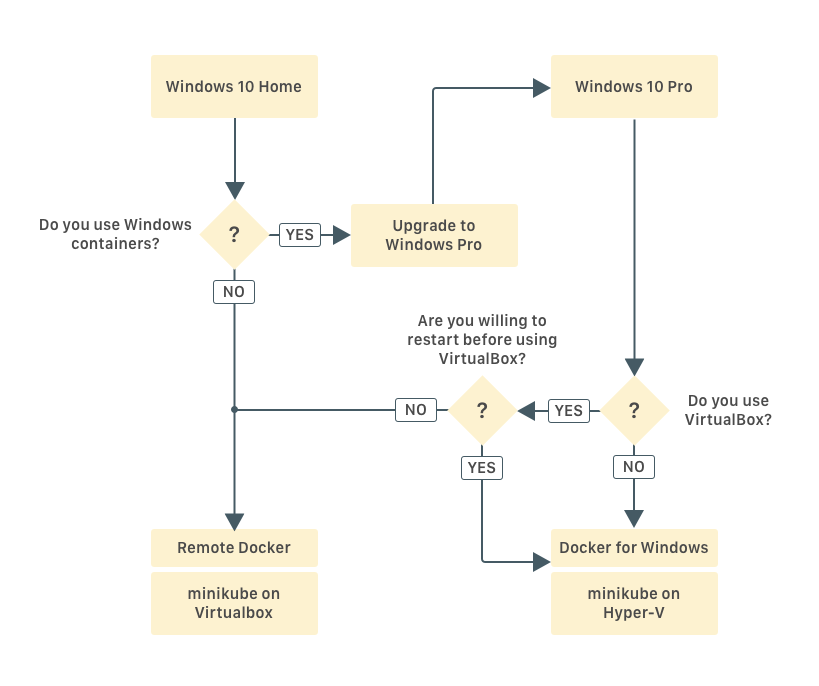
Using Windows 10 Home? You won't be able to run Docker for Windows
When the people at Docker decided to implement Docker on Windows, they opted for Hyper-V as their virtualisation technology. The benefit is crystal clear: excellent performance and a native hypervisor.
Unfortunately not all Windows versions ship with Hyper-V.
And if you're using Windows 10 Home or Student edition, you are out of luck. You won't be able to install and run Docker for Windows.
But it's not game over.
There are plenty of replacements based on Docker Machine such as Docker Toolbox or minikube.
The way Docker Machine works is simple: there's a virtual machine that runs Linux and Docker. And you connect from your host to the remote Docker daemon in that virtual machine.
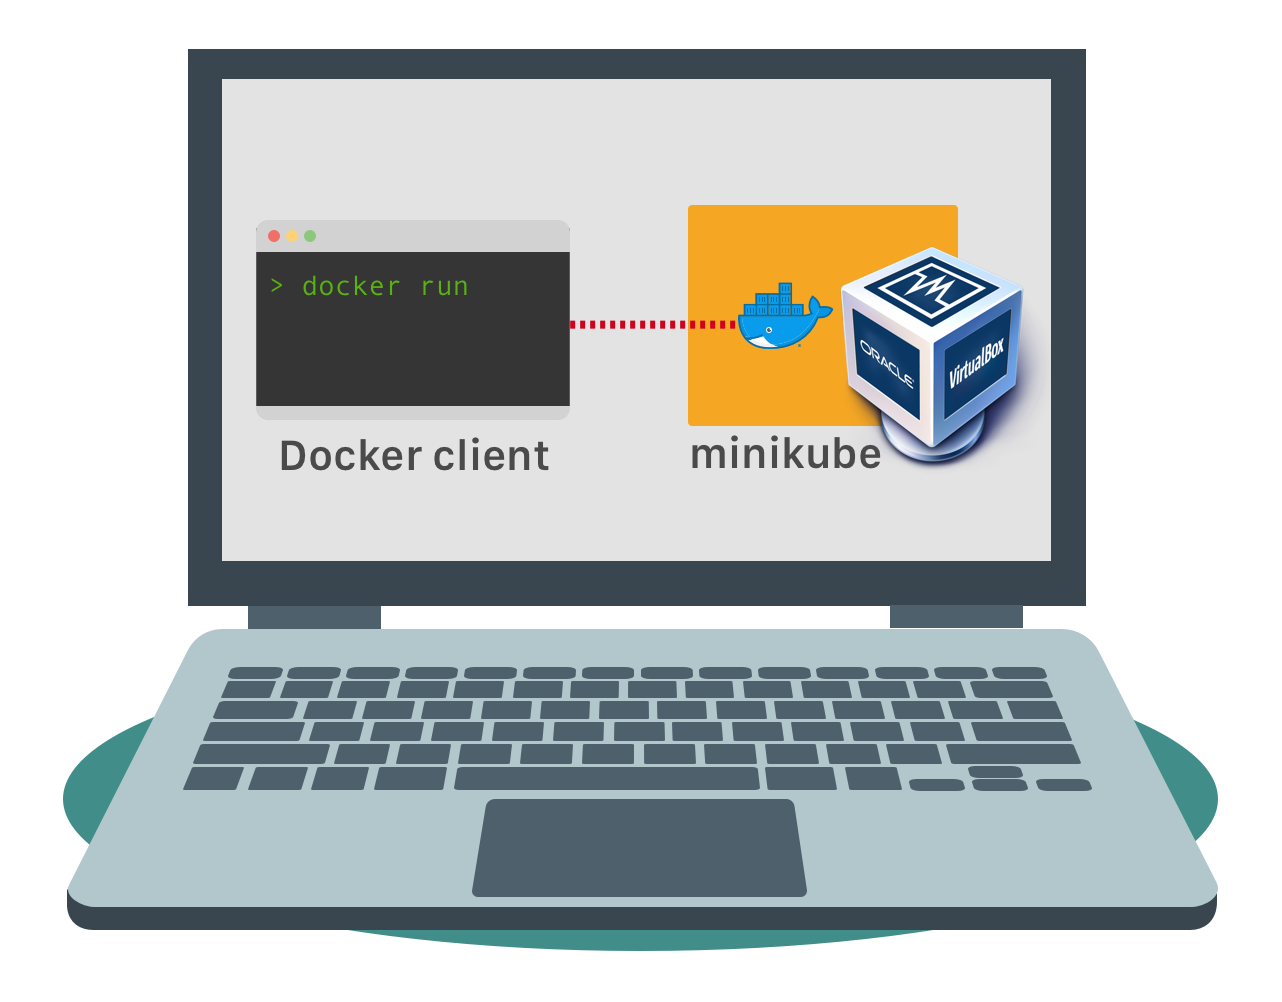
Minikube is the somehow one of the most interesting virtual machine based on Docker Machine — that's if you're into running Kubernetes clusters.
In fact, minikube is a virtual machine that runs Docker and Kubernetes. It's usually used to run Kubernetes only, but you can use it to run Docker containers too.
You won't reach the same speed as Docker for Windows, but you can build and run containers without Hyper-V.
With Windows 10 Pro, Docker for Windows is the best — until it isn't
You have the latest Windows 10 Pro, and you can install Docker for Windows.
Excellent performance and excellent developer experience. You're sorted, aren't you?
Maybe.
The hypervisor used by Docker for Windows is extremely powerful — indeed it's called a Type-1 hypervisor.
It's so powerful that it doesn't play nicely with weaker hypervisors such as the one in VirtualBox — or Type-2 hypervisors.
You can't have Type-1 and Type-2 hypervisors running at the same time on your machine. Or in other words, if you run Docker for Windows, you won't be able to start your virtual machines on VirtualBox.
Depending on your setup, this may be an insignificant detail.
Perhaps you're fully committed to a containerised world, and you left virtual machines behind.
An old and distant memory.
But if you're still relying on virtual machines and tools such as Vagrant, perhaps you should be aware of the annoyance.
You can enable and disable the Hyper-V hypervisor at will, but it requires a restart of your computer.
If you're frequently switching from containers to virtual machines, perhaps minikube is a more convenient choice. You don't need to restart your computer when you change from containers to virtual machines.
But you don't benefit from the extra performance or the improved experience.
Lastly, if you're interested in running Windows containers — aka containers with a base image that inherits from Windows — Docker for Windows is the only option.
And you will need Windows 10 Pro or Enterprise for that.
Running a local Kubernetes cluster
If you want to run Kubernetes locally, you should consider minikube.
Minikube is a virtual machine running on an embedded Linux Distribution (Buildroot) and comes with the Docker daemon pre-installed.
It's Kubernetes with batteries included.
Minikube can run virtual machines using VirtualBox or Hyper-V — there are more options too.
Which is great news if you already have Hyper-V and want to maintain using the same hypervisor for Docker and minikube.
It's equally good news if you can't run Hyper-V since you can use VirtualBox.
That's a lot of choices and trade-offs, so here's a summary of what was discussed:
Prerequisites
You can download and install all the dependencies such as Docker for Windows, Docker Toolbox, VirtualBox, kubectl, Docker CLI, etc. from the official websites, but it's hard work.
You have to visit the website, hope that the URL is still valid, search for the download page, select the right version, download it, install it and finally add it to your path. It's doable, but I'm sure you would rather spend time doing more coding than chasing and installing executables from the internet.
Enter Chocolatey.
Chocolatey is a package manager for Windows. You tell it what executables you wish to install, and Chocolatey installs them on your behalf.
You're outsourcing all the hard work of provisioning software to someone else.
Installing Chocolatey is easy. You can find the full instructions on the official website. But in a nutshell, this what you have to do:
- Start
cmd.exeas administrator - Execute this long command:
@"%SystemRoot%\System32\WindowsPowerShell\v1.0\powershell.exe" -NoProfile -InputFormat None -ExecutionPolicy Bypass -Command "iex ((New-Object System.Net.WebClient).DownloadString('https://chocolatey.org/install.ps1'))" && SET "PATH=%PATH%;%ALLUSERSPROFILE%\chocolatey\bin"
- Reload
cmd.exe
If the installation was successful, you could now search for applications to install with:
choco search docker
Since you're there, you could give
choco a go. You could install Cmder — a modern shell for Windows with:choco install cmder -y
Chocolatey installed the binary in
C:\tools. If you wish to continue the tutorial using Cmder, you should start the binary as an administrator.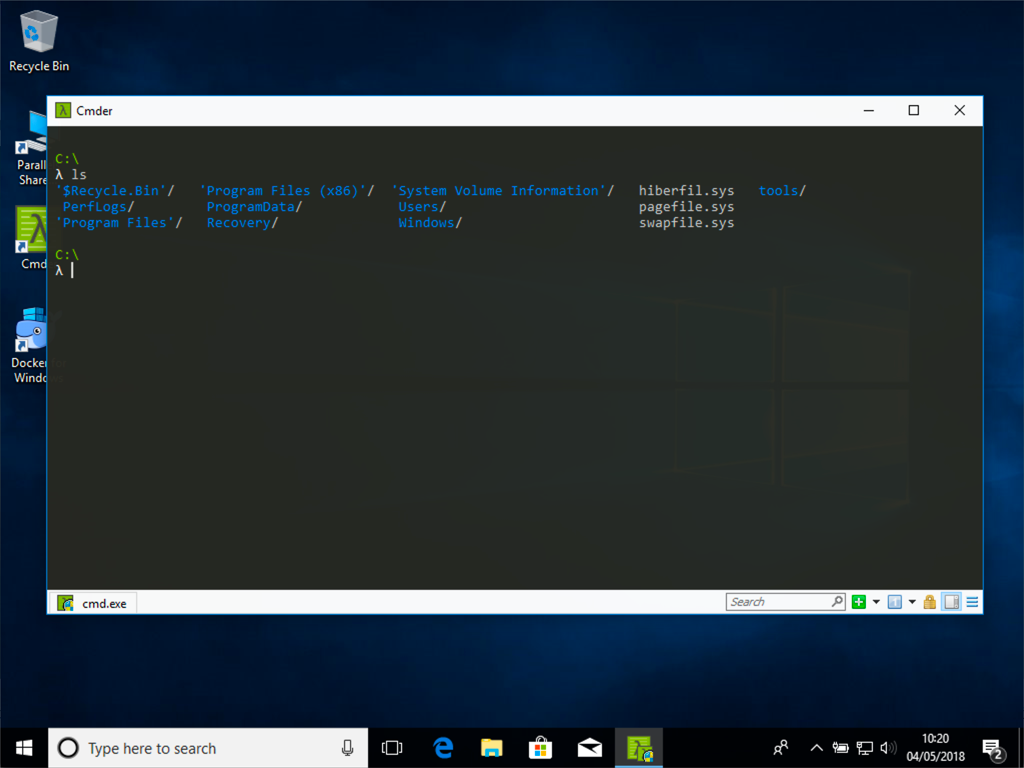
Looking nice!
1. Installing Docker and Kubernetes on Windows 10 Pro
Installing Docker
You can download Docker for Windows with:
choco install docker-for-windows -y
Restart your laptop. Docker will ask you if you wish to enable Hyper-V.
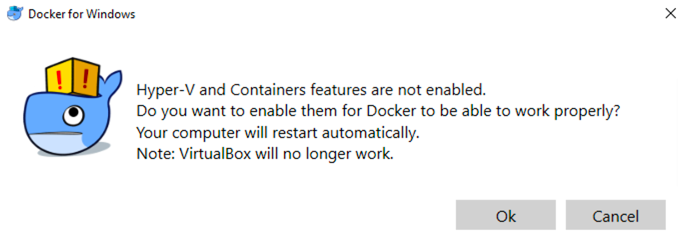
Yes, you do!
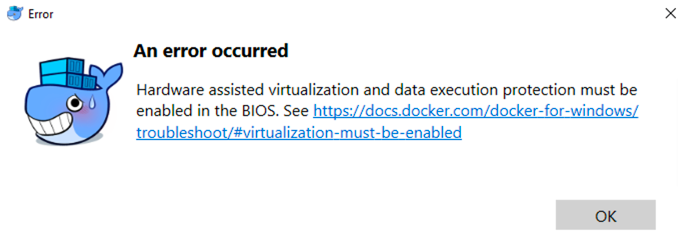
You should be aware that Docker requires VT-X/AMD-v virtual hardware extension to be enabled before you can run any container. Depending on your computer, you may need to reboot and enable it in your BIOS.
You can check if VT-X/AMD-v is enabled by runningsysteminfofrom the command prompt.
If you're unsure VT-X/AMD-v was enabled, don't worry. If you don't have it, Docker will greet you with the following error message:
Hardware assisted virtualization and data execution protection must be enabled in the BIOS.
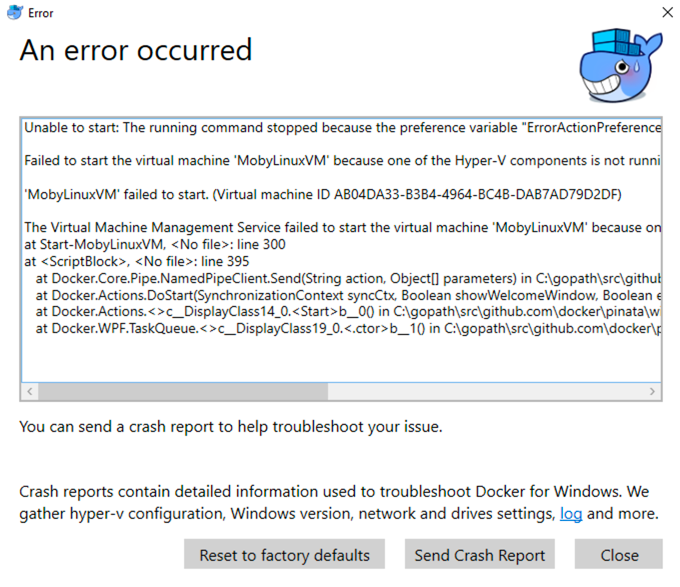
Another common error has to do with the Hyper-V hypervisor not being enabled. If you experience this error:
Unable to start: The running command stopped because the preference variable "ErrorActionPreference" or common parameter is set to Stop: 'MobyLinuxVM' failed to start. Failed to start the virtual machine 'MobyLinuxVM' because one of the Hyper-V components is not running.
bcdedit /set hypervisorlaunchtype auto
You should reboot your machine and Docker should finally start.
But how do you know if Docker is working?
Open a new command prompt and type:
docker ps
If everything works as expected, you should see an empty list of containers running.
If your Docker daemon isn't running, you're probably banging your head against this error:
error during connect: Get http://%2F%2F.%2Fpipe%2Fdocker_engine/v1.37/containers/json: open //./pipe/docker_engine: The system cannot find the file specified. In the default daemon configuration on Windows, the docker client must be run elevated to connect. This error may also indicate that the docker daemon is not running.
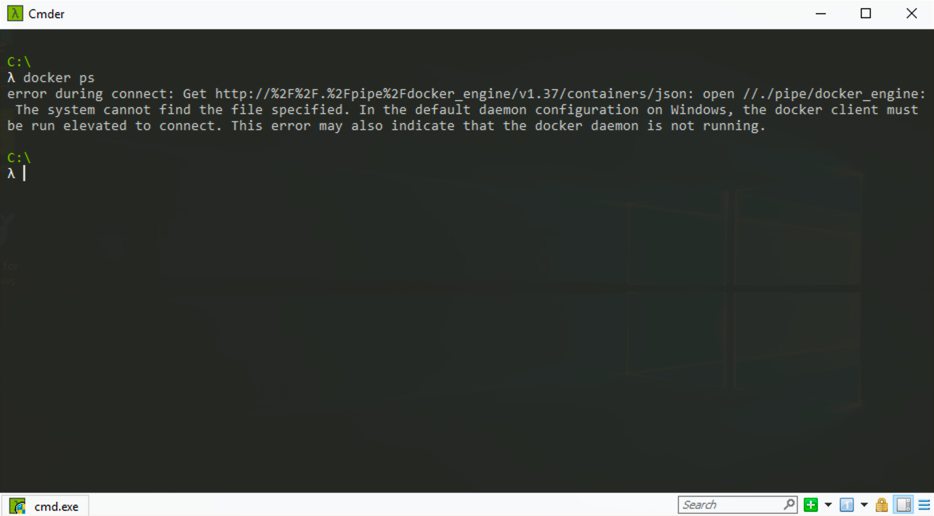
The error above is suggesting that your Docker installation is not behaving normally and wasn't able to start.
You should start your Docker daemon before you connect to it.
Installing Minikube on Hyper-V
You can download minikube with:
choco install minikube -y
Before you start the cluster, you should create an external network switch. First, you need to identify what network adapters you have on your computer. You should ignore the virtual interface and focus on real, live, physical network adapters such as Ethernet or WiFi. Picking a real adapter will let you share the internet connection with the virtual switch.
To inspect your current network adapters, you can use the
Get-NetAdapter cmdlet in Powershell. Click left lower corner Windows icon and start typing "PowerShell" to open it.Type the following command to list all the adapters:
Get-NetAdapter

If you're finding it hard to select an adapter, try picking one that has Up in the Status column.
Once you identified the right adapter, you can create an External Virtual Switch with the following command:
New-VMSwitch –Name "minikube" –AllowManagement $True –NetAdapterName "INSERT_HERE_ADAPTER"
Don't forget to insert the adapter that you selected earlier.
If you fail to create the network switch, you should see the following error when you start minikube:
E0427 09:06:16.000298 3252 start.go:159] Error starting host: Error creating host: Error executing step: Running precreate checks. no External vswitch found. A valid vswitch must be available for this command to run. Check https://docs.docker.com/machine/drivers/hyper-v/.
You can test your minikube installation with:
minikube start --vm-driver=hyperv --hyperv-virtual-switch=minikube
Please note that--vm-driver=hyperv --hyperv-virtual-switch=minikubeis necessary only for the first start. If you wish to change the driver or the memory you have tominikube destroyand recreate the VM with the new settings.
If for any reason minikube fails to start up, you can debug it with:
minikube delete
minikube start --vm-driver=hyperv --hyperv-virtual-switch=minikube --v=7 --alsologtostderr
The extra verbose logging should help you get to the issue. In my particular case, minikube used to fail with:
E0427 09:19:10.114873 10012 start.go:159] Error starting host: Error starting stopped host: exit status 1.
Not very helpful. After enabling verbose logging the issue was more obvious:
+ Hyper-V\Start-VM minikube
+ ~~~~~~~~~~~~~~~~~~~~~~~~~
    + CategoryInfo          : FromStdErr: (:) [Start-VM], VirtualizationException
    + FullyQualifiedErrorId : OutOfMemory,Microsoft.HyperV.PowerShell.Commands.StartVM
I was running out of memory!
It's time to test if you're installation is successful. In the command prompt type:
kubectl get nodes
You should be able to see a single node in Kubernetes.
Running virtual machines on VirtualBox
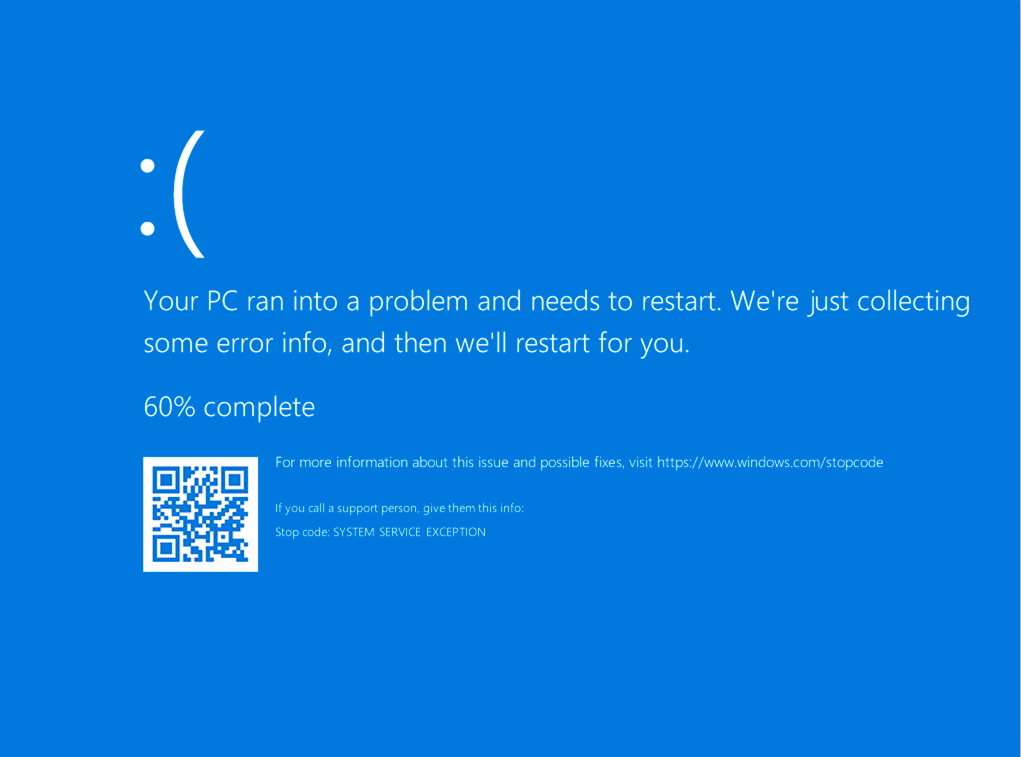
Since you enabled Hyper-V on your device, you won't be able to start any VM on VirtualBox. You can still try and launch your VM. You may experience the following error, though:
Your PC ran into a problem and needs to restart. We're just collecting some error info, and then we'll restart it for you.
If you wish to use VirtualBox or any other executable that uses a Type-2 hypervisor, you should disable it and restart your computer first.
Open a new command prompt as an administrator and type the following:
bcdedit /set hypervisorlaunchtype off
After restarting your device, you should be able to use VirtualBox as usual. If you wish to use Docker and minikube again, you should enable Hyper-V and restart your machine.
Open a new command prompt as an administrator and type the following:
bcdedit /set hypervisorlaunchtype auto
Restart, and now you're ready to run and deploy containers to Kubernetes!
2. Installing Docker and Kubernetes on Windows 10 Home
If you're planning on using Windows 10 Home or Student edition, you can probably save yourself from installing another Docker Machine tool such as Docker Toolbox. You should use minikube as a remote Docker daemon as well as your local Kubernetes cluster.
You can download and install minikube with:
choco install minikube -y
At the end of the installation, you can start minikube with:
minikube start
The command will download an ISO for VirtualBox and start the virtual machine. Once started, you should be able to query the Kubernetes cluster with:
kubectl get nodes
And see a single node.
To connect to the remote Docker daemon, you should install the Docker client with:
choco install docker -y
You can connect to the minikube remote Docker daemon with:
@FOR /f "tokens=*" %i IN ('minikube docker-env') DO @%i
Please note that you should type the above command every time you open a new terminal. A shorter way to remind yourself about that command is to typeminikube docker-env.
If the connection was successful, you should be able to list all the running containers with:
docker ps
You should see a lot of running containers. Most of those belong to Kubernetes.
You've made it this far: you're ready.
But before you move on, you should be aware of some the limits of using minikube as your remote Docker daemon.
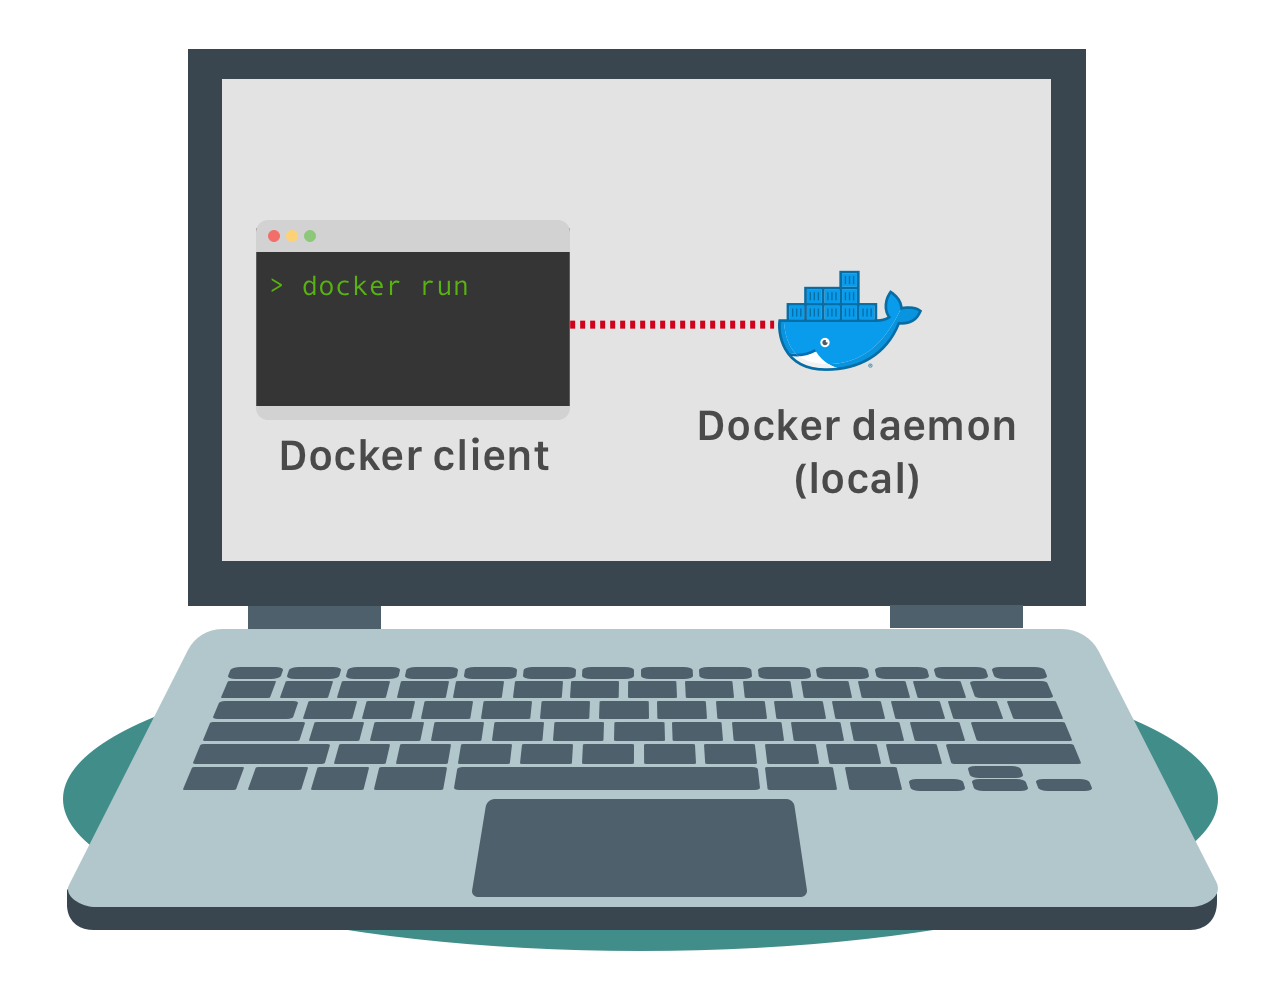
Docker was designed in two parts:
- the Docker daemon — you can think about it as a server with an API. You can send commands to the API and Docker will receive and execute them on your behalf.
- the Docker CLI — the executable that sends the commands to the Docker daemon API
Most of the time you're interacting with the Docker CLI, and you don't see the Docker daemon.
So why having a client and a server?
Why not having a single binary?
It all comes down to flexibility.
When you run Docker for Windows, you Docker CLI is connected to your local Docker daemon.
But sometimes you don't have a Docker daemon.
Perhaps you want to build containers on a remote machine. Perhaps you can't run Hyper-V on your machine, and your Docker daemon is installed in a virtual machine in VirtualBox. Precisely the case if you're running minikube. Your Docker CLI is connected remotely to a Docker daemon located inside the minikube virtual machine.
When you're running containers against a remote Docker daemon, you need to adjust your port bindings.
In Docker for Windows, you can run and bind a container on port 8080 with the following command:
docker run -ti -p 8080:80 nginx
Please note how the container exposes port 80 and you mapped that port to 8080.
You can visit http://localhost:8080 and see the "Welcome to Nginx" page.
If you run the same command using the remote Docker daemon and visit the same page, you won't see anything. The URL is unreachable.
So, what's different? The Docker daemon is in charge of running the containers and forwarding ports.
With Docker for Windows the daemon runs locally — on your localhost.
So you can visit the running container on localhost. Minikube, on the other hand, runs the Docker daemon inside the virtual machine.
It's a remote Docker daemon.
You need to visit the machine with the Docker daemon if you wish to see your running container. You can find the IP address with:
minikube ip
You can visit http://your_minikube_ip:8080 and see the "Welcome to Nginx" page.
Testing your Docker installation
You installed Docker, but how do you know if it works for real?
In your terminal type:
docker run -ti -p 8080:80 wordpress
Once Docker has completed downloading all the package, you should visit http://localhost:8080/.
Please note that, if you're running minikube as your remote Docker daemon, you should use http://minikube_ip:8080 as your URL.
You should be able to see the Wordpress installation Wizard.
Hurrah!
Wordpress is serving traffic from within a container!
Please note that you won't be able to complete the Wordpress installation because there's no database.
Testing your Kubernetes cluster installation
It's about time to test your local Kubernetes cluster. In this section, you will deploy the Smashing.io dashboard.

Deploy Smashing to Kubernetes
You can deploy your dashboard to Kubernetes with:
kubectl run smashing --image=visibilityspots/smashing --port=3030
Once Kubernetes completes downloading the container, you should see it running:
kubectl get pods
Exposing the dashboard
You can expose your deployment with:
kubectl expose deployment smashing --type=NodePort
You can open the dashboard in your browser with:
minikube service smashing
You can visit the dashboard from Kubernetes! Hurrah!
A bird's eye view of Kubernetes
Minikube is packed with goodies.
You can visit the official Kubernetes dashboard with:
minikube dashboard
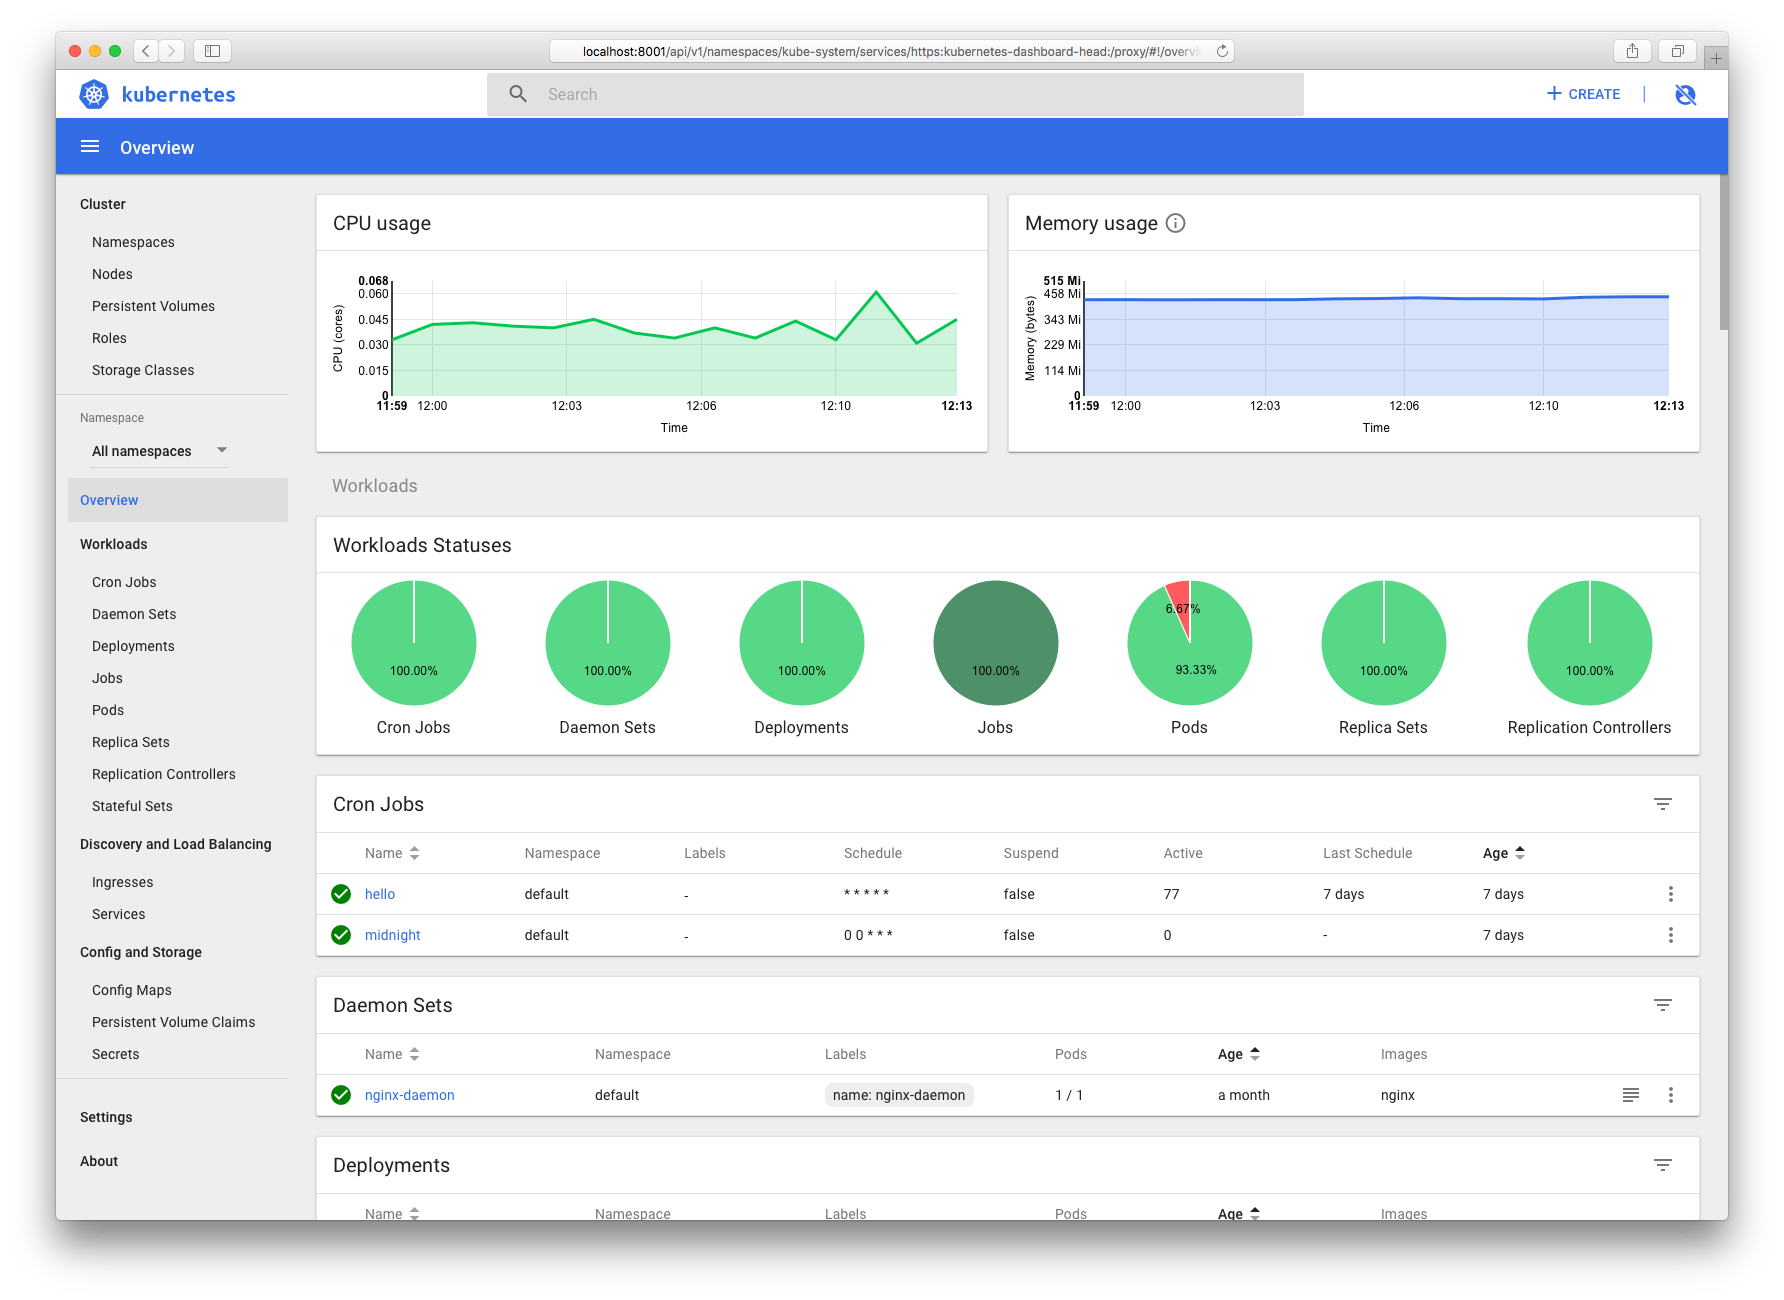
From there, you can explore your cluster and deploy applications.
Summary
And that's all!
Now you know all the options when it comes to installing Docker and Kubernetes on Windows. And since you have a fully working environment, you should check out the tutorial on how to deploy Laravel applications to Kubernetes.