PHP software development workflow
Outlining my PHP software development workflow for creating a new composer package. The process is similar for a composer library as it is for any php project done the right way. Learn PHP from scratch including setting up a virtual machine, using version control and documenting your code.

Continuing from the previous post Developing a Command Bus in PHP, we will look into how to get started in setting up our composer library project. Although my PHP software development workflow does vary slightly from project to project, most steps are more or less the same. Whether your project is the result of a successful proposal or you want to build an open source composer package like we're doing here, this post will guide you in working with PHP the right way. If you are learning PHP from scratch and find that I am missing some intermediary steps or making assumptions, please feel welcome to comment below and I'll be more than happy to explain in more detail.
How to get started on a new PHP project
First things first, let's get organised.
As with every project, we obviously have some sort of list of features or requirements. Instead of having to remember a bunch of things and having a number of resources spread everywhere; in emails, message threads, Skype conversations and numerous attachments, I start by putting everything related to the project in one place. I use the Kanban board on GitHub.com to list everything that I know needs doing. This way I don't have to remember anything and I can find everything that I need in one place, including conversing with the project stakeholders.
Throughout the years, I have been part of Scrum, Kanban and ScrumBan teams, when given a choice, I prefer to adopt a Kanban methodology to my projects because it fits better with my remote teams. This is even truer when working on Open Source projects where contributors come and go over time which makes time-boxed Sprints impossible. Also, I find Kanban to fit perfectly with my Continuous Integration strategies.
So, I head to over GitHub and create a new repository were both the code and the Kanban project will be hosted. However, because I want to allow for any developer to be able to contribute to this library and to keep things even more organised, I will create the repository under an organisation "SwellPhp" so that I can then fork it from my personal account and thus I'll be a code contributor as everyone else involved. I find this process better when reviewing code and approving pull requests without risking conflicts with my own contributions.
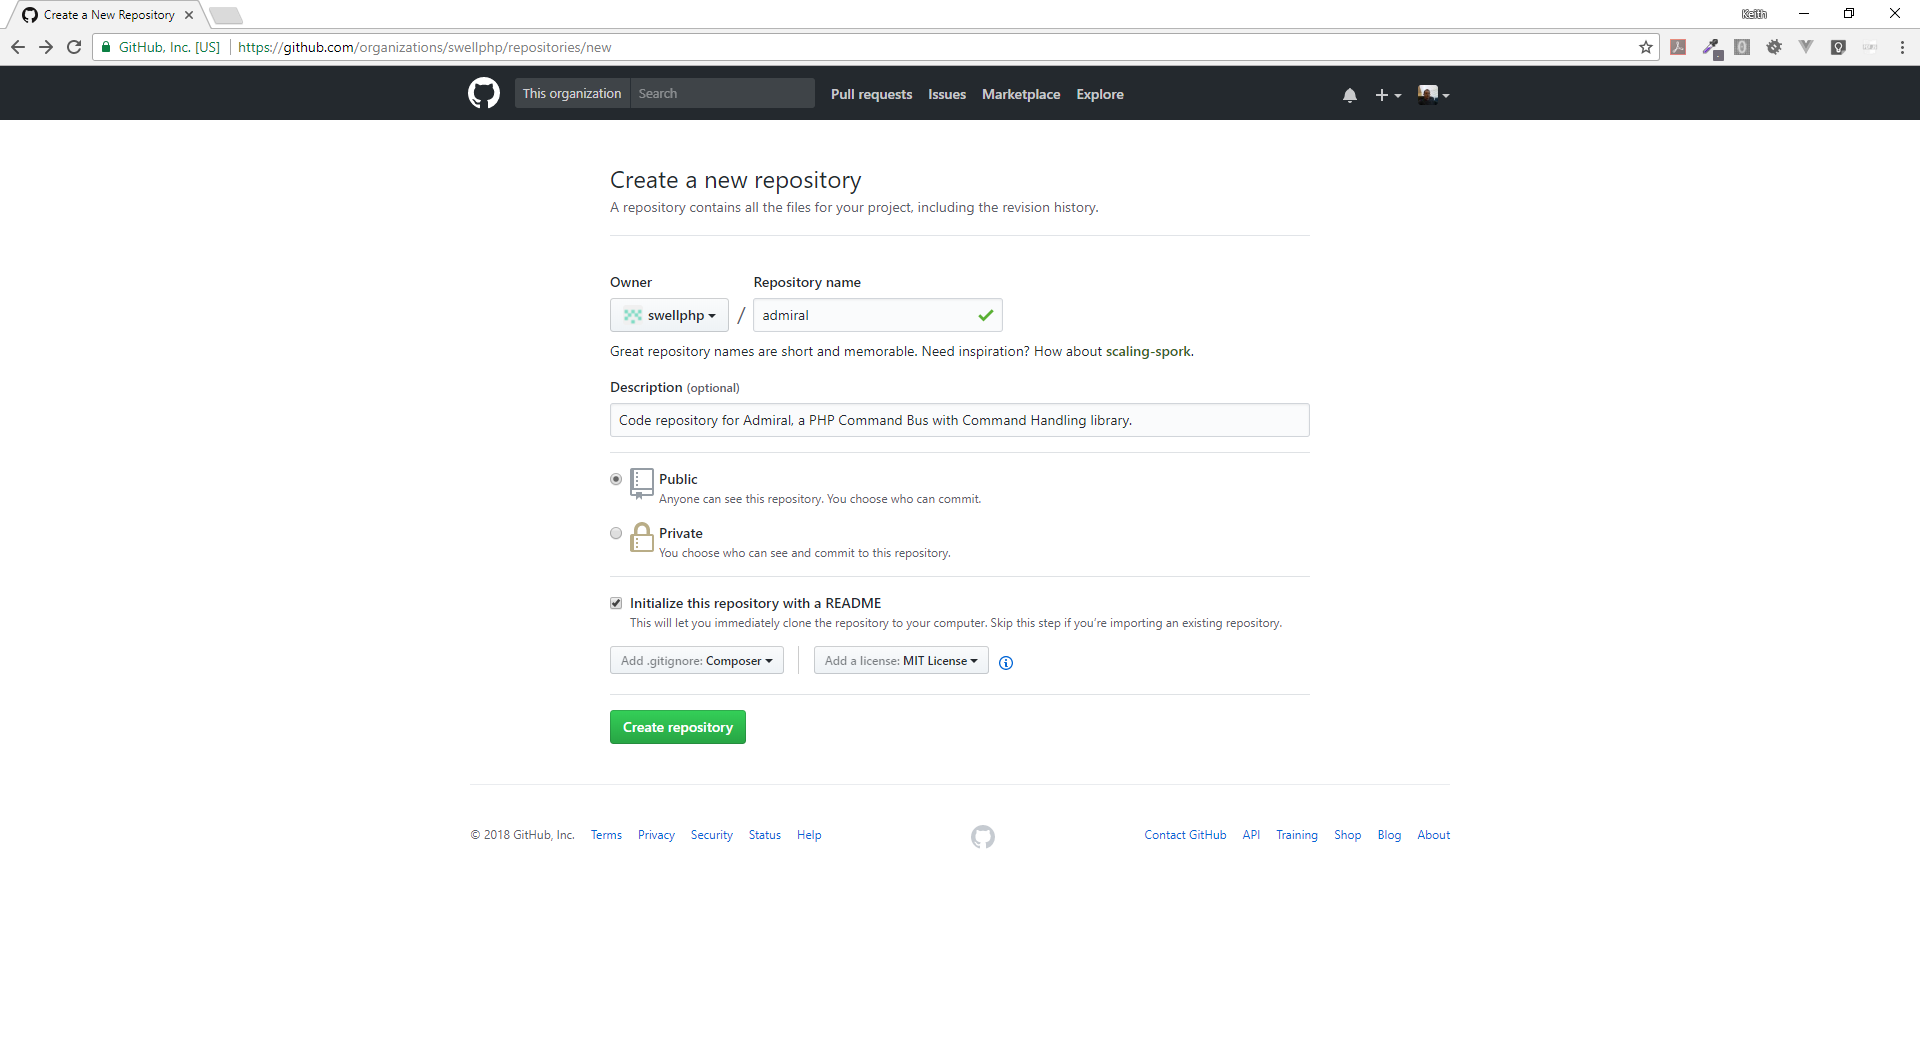
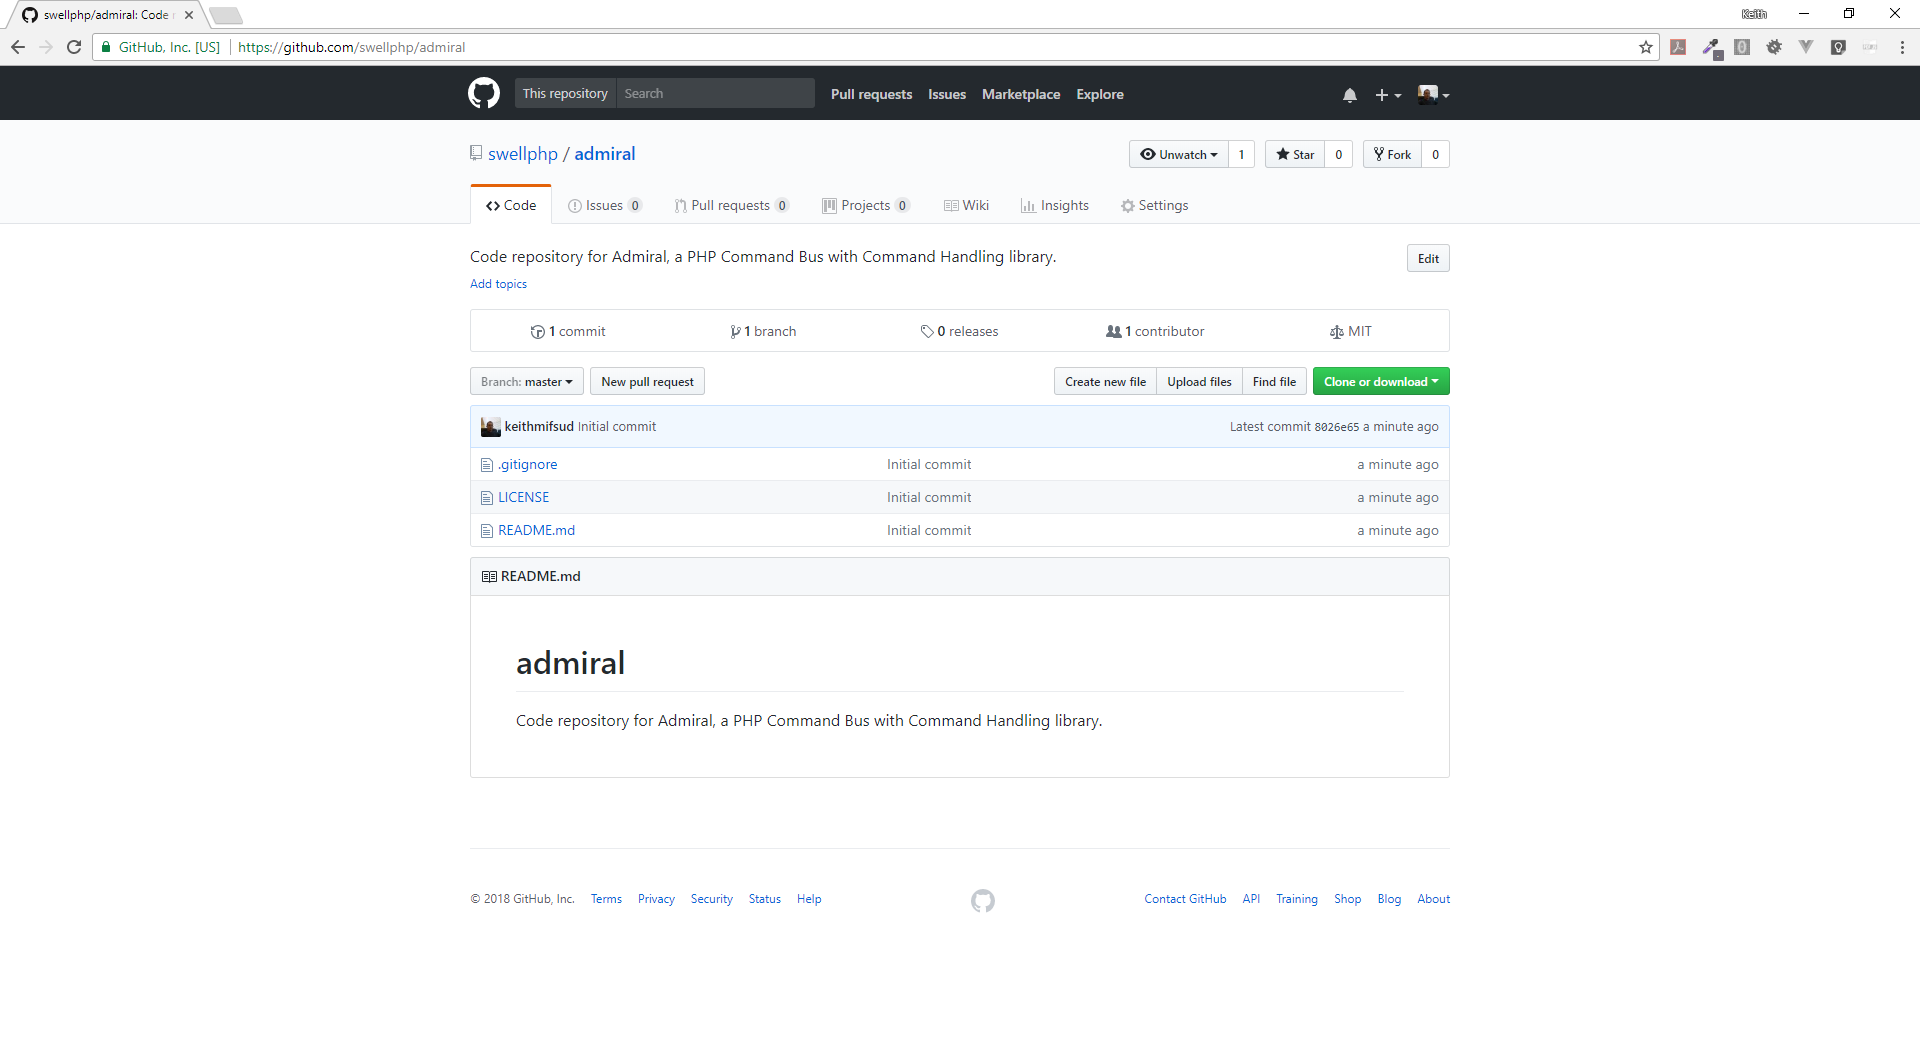
This process is straight forward; from GitHub, I click on the "SwellPhp" organisation and then click the "New" button, and enter the repository name to match the project's name, in this case "admiral". In the same screen I enter a brief description for the repository and since I'm here, I also add the initial Readme, .gitignore and License files. Since this is an open source project, I'll obviously make it publicly available and choose an appropriate license. In this case I chose the "MIT" licence so that everyone can use the code as they like as long as they provide an attribution to the author. I also selected the "Composer" pre-configured .gitignore file.
Now I want to create my project so that I have access to the Kanban board. This is simple, just give the Kanban board a name and a description. I also use the "Automated Kanban" template so my cards, issues and pull-requests are automatically transitioned in between columns during certain events.
Once I have a Kanban board, I immediately create cards for each task that I'm aware about. This should be kept simple and not much detail is needed as this initial purpose is similar to a "brain dump list" and I'll break down each card into smaller units of work once I start working on the specific card. Basically, all I do at this stage is create a card for each feature that I know about and then add more cards as tasks come up throughout the project.
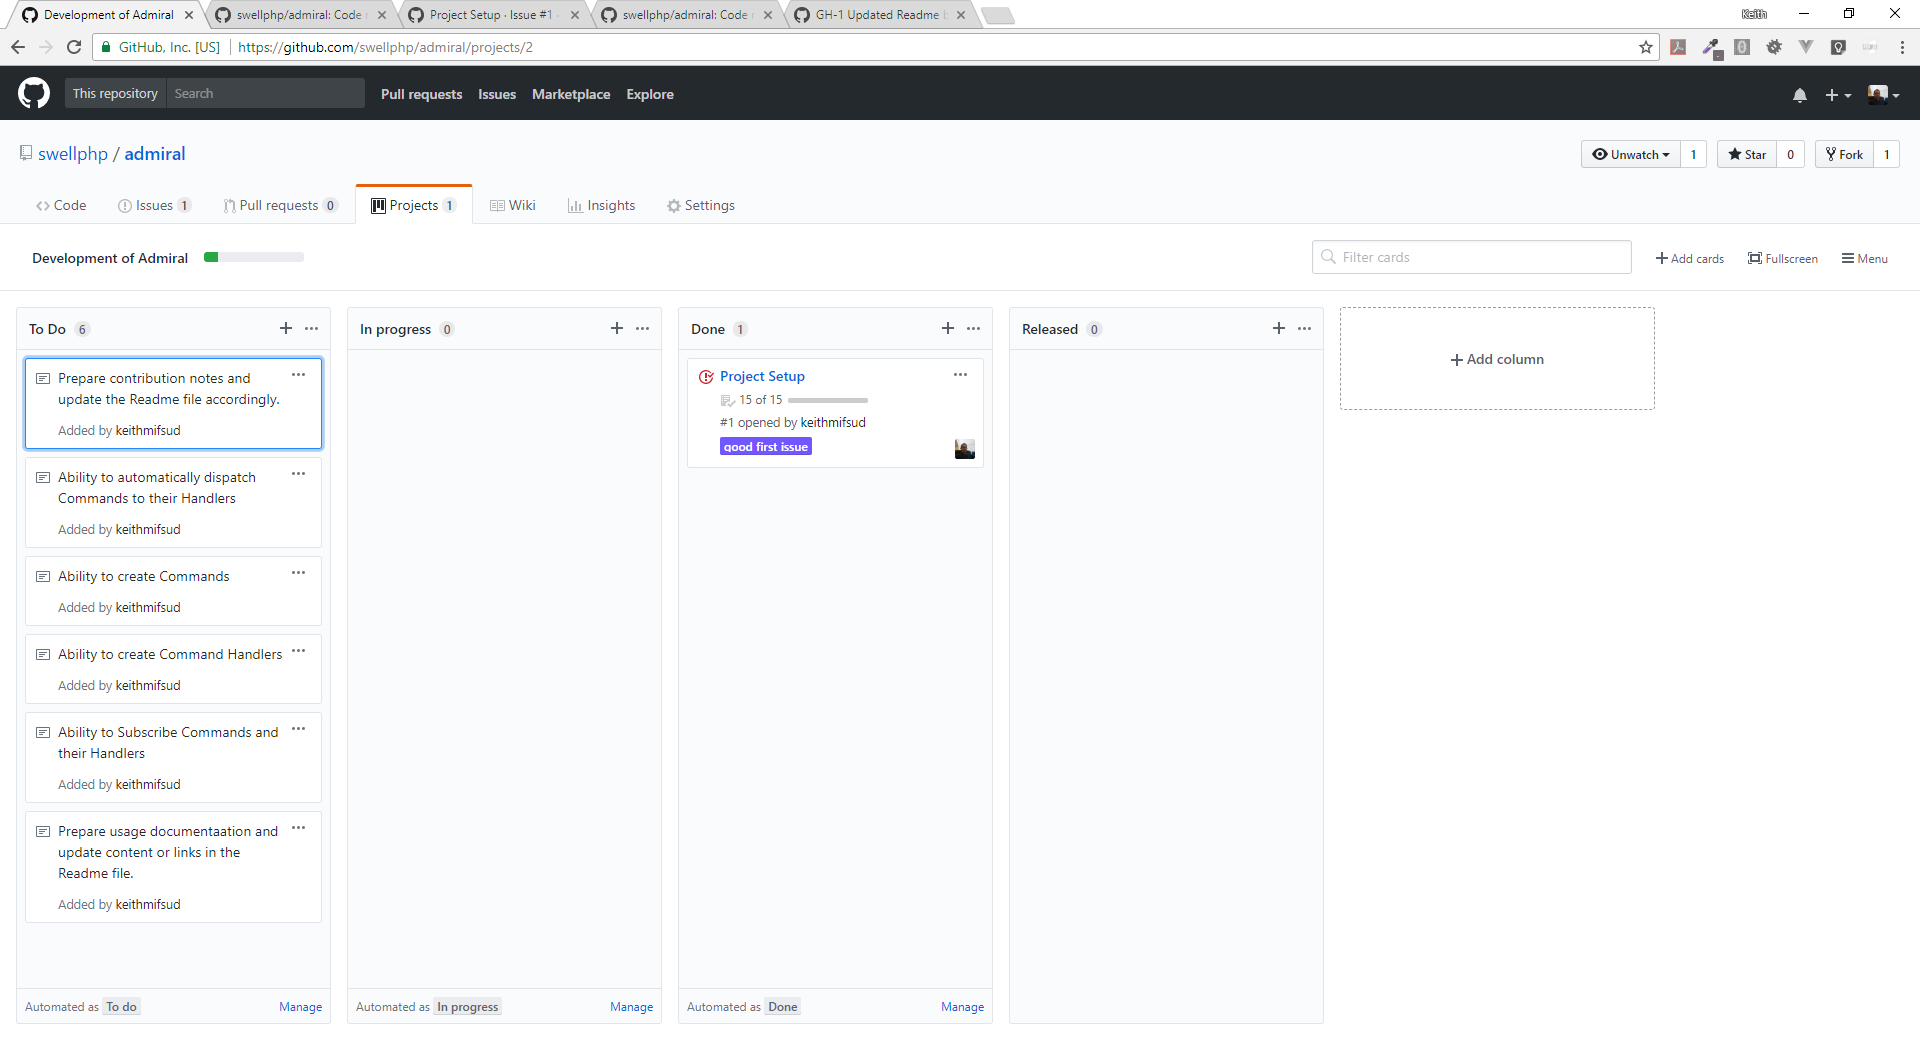
The Admiral project is quite simple as reflected on the Kanban board.
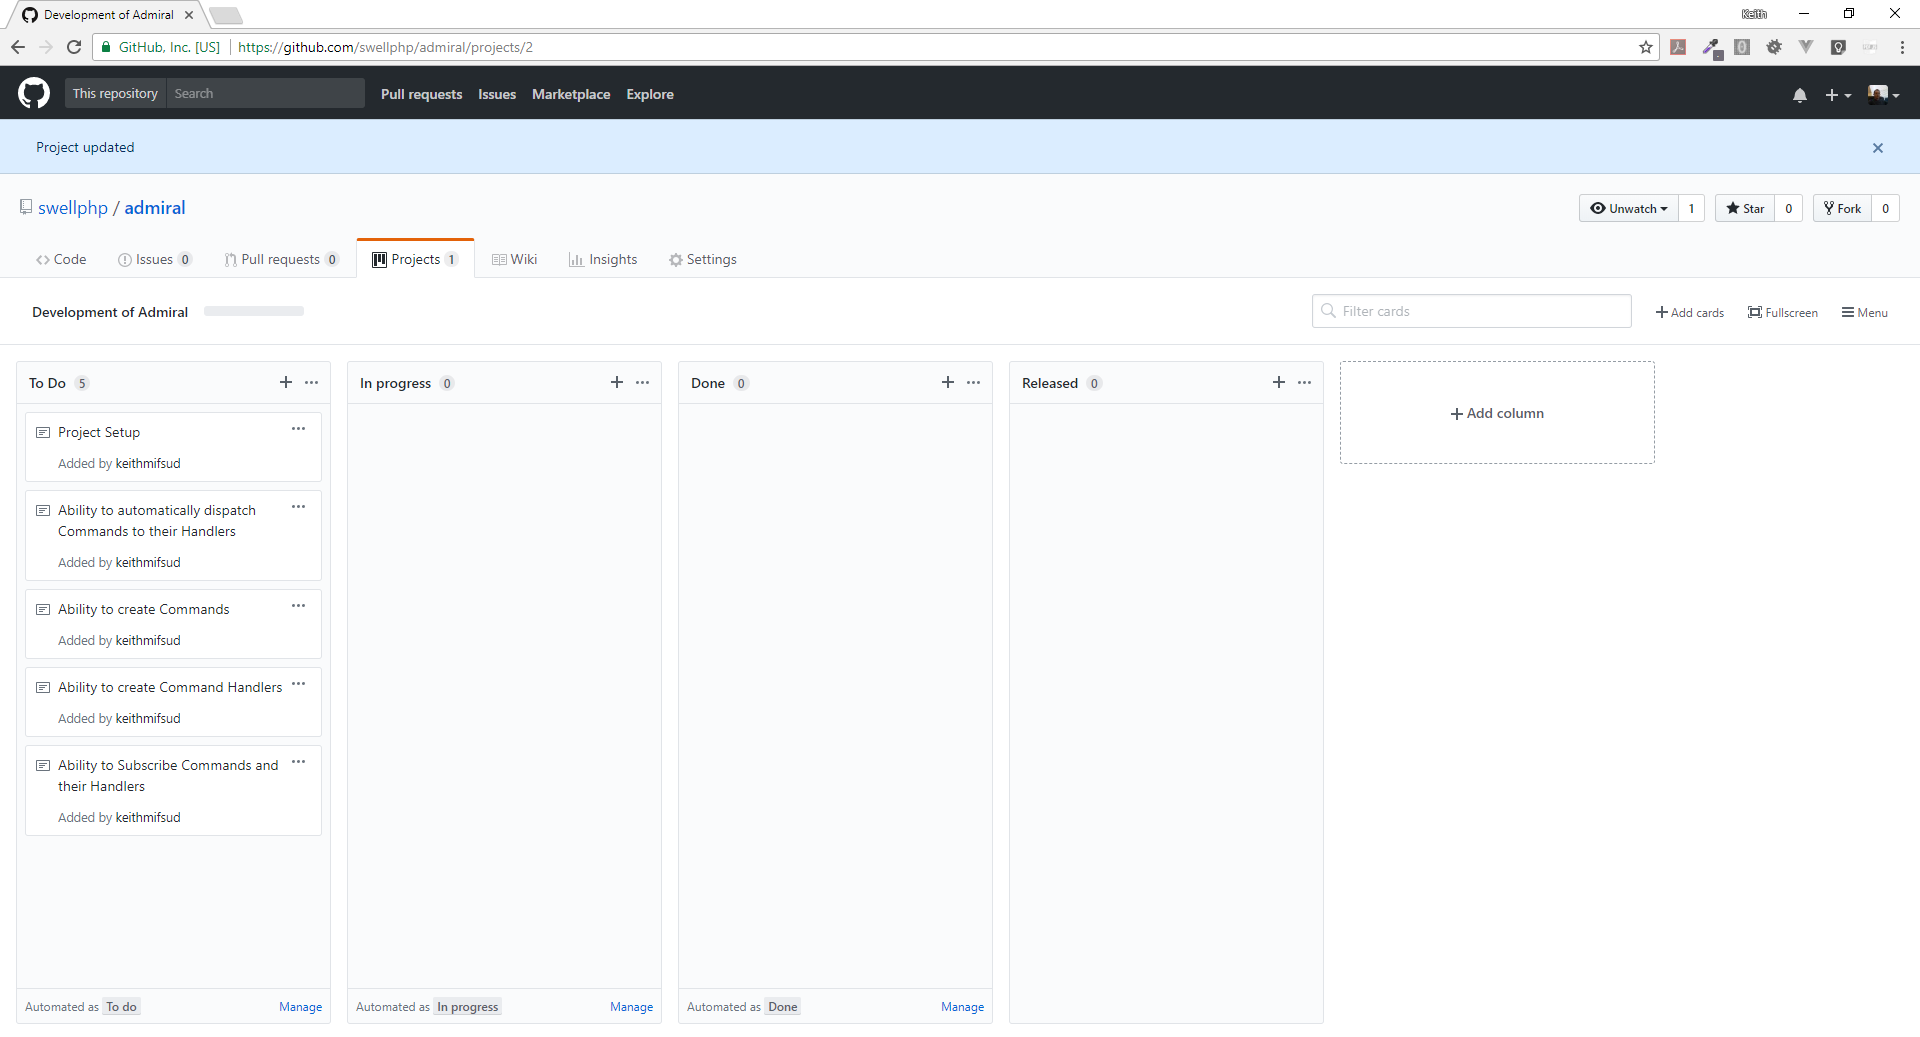
I simply created a card for each task I know off at this time. Now I can actually start working 😊
Work station and initial set up
As with every task, I start by moving the current card from the "To Do" column to the "In Progress" one. I also convert the current card into an issue so that it has an identifier which I'll match with the repository branch name once I start submitting code as I'll explain shortly. So, I moved the first card named "Project Setup" to the "In Progress" column and converted it to an issue. The next step is to add some beautiful tick boxes with broken down tasks so that I don't forget anything but mainly so that this issue is fully planned in advance and I can just get on with it.
I also created a new milestone named "Release of version 1.0" and some additional issue labels to categorise my tasks appropriately.
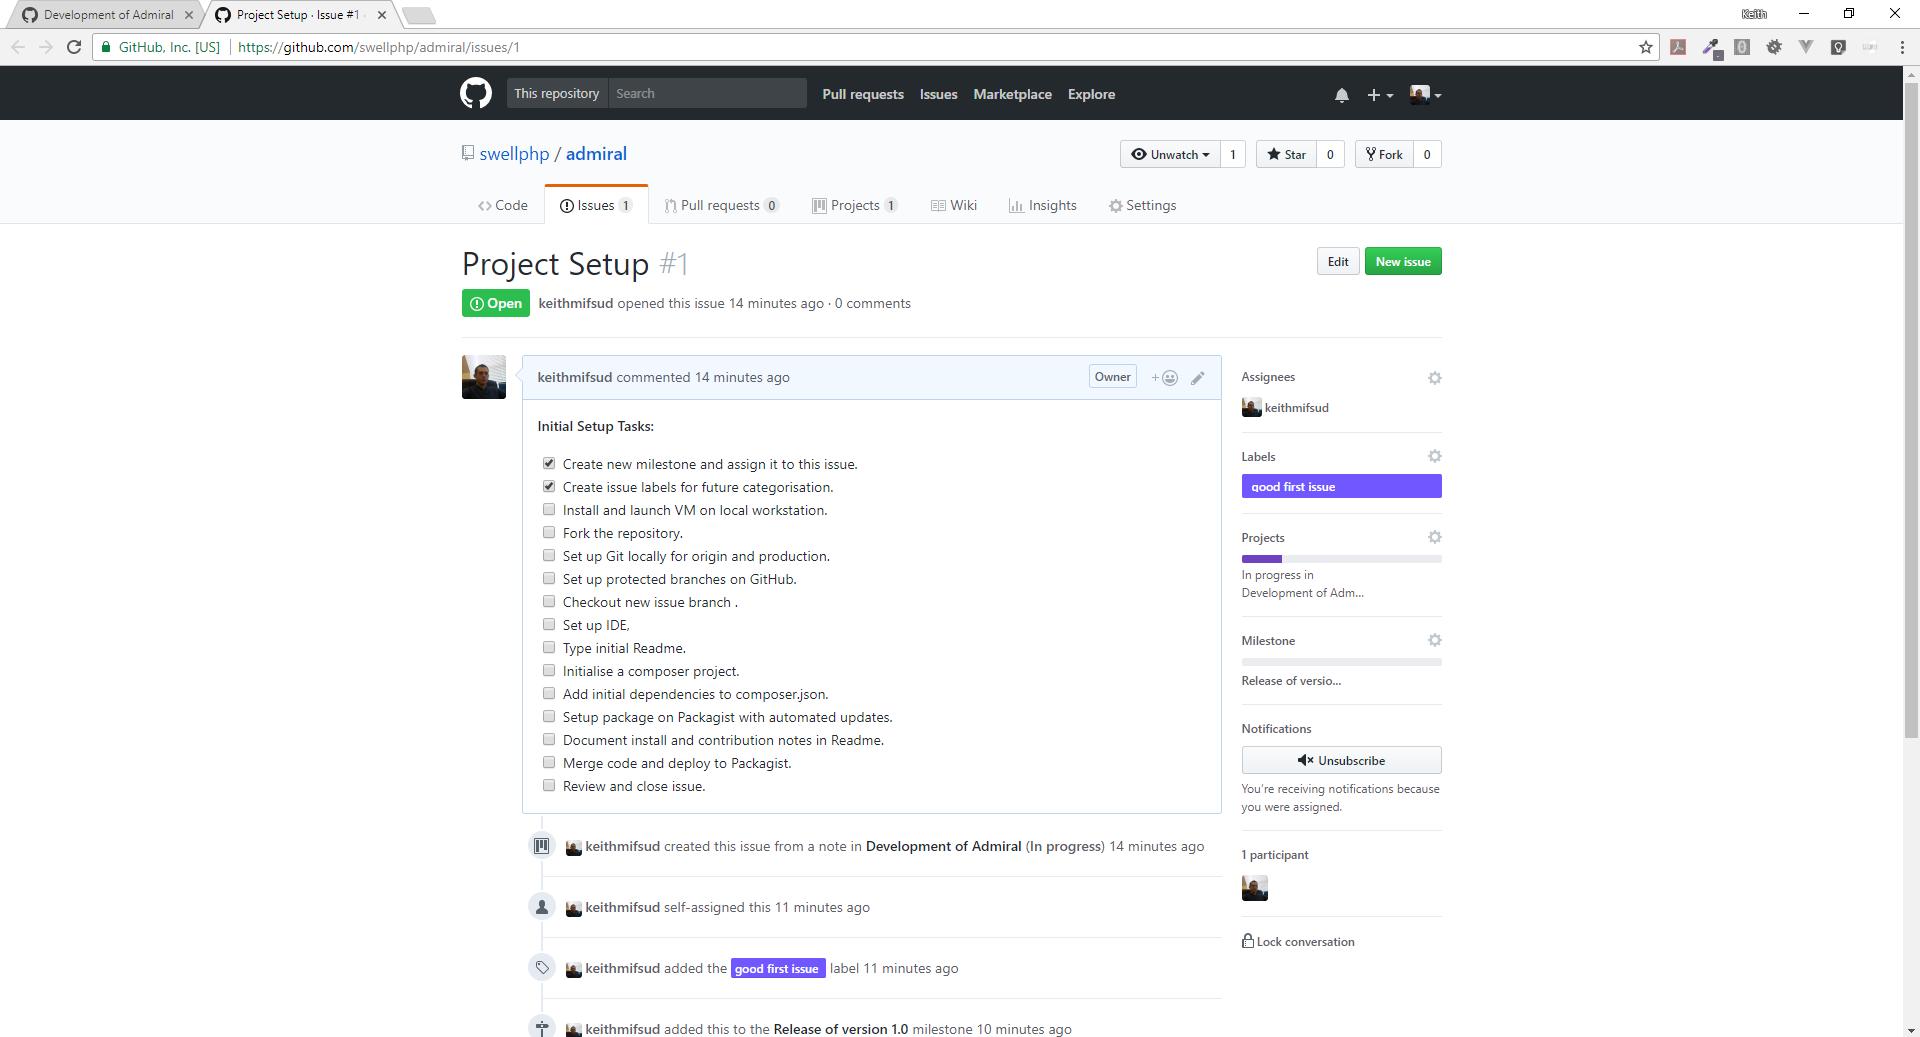
As you can see in the above screenshot, we have a broken down list of all the steps required in getting set up so we can now go ahead and move on to the next "sub" task of installing and launching a vagrant box.
As I do with most PHP projects, I use the Homestead vagrant box provided by Taylor Otwell, the creator of Laravel. I'm assuming that you'll have all of Homestead's dependencies installed already, including composer on your host machine but if you don't, you can follow the instructions on the Homestead documentation or you can ask me for more detailed instructions in the comments section below. Also note that I work on a Windows 10 workstation so the commands on the host machine will vary for Mac users. However, I'm using Git Bash so I have access to the standard unix commands.
# Create the project directory.
$ mkdir -p ~/Code/swellphp/admiral

# Cd into it.
$ cd ~/Code/swellphp/admiral

# Require homestead.
$ composer require laravel/homestead --dev

# Export the Homestead configuration file.
$ vendor/bin/homestead make
Since this project does not require an http server or a database, I will comment those lines out from the Homestead.yaml file and then launch the box.
# Homestead.yaml

ip: 192.168.22.12
memory: 2048
cpus: 1
provider: virtualbox
authorize: ~/.ssh/id_rsa.pub
keys:
    - ~/.ssh/id_rsa
folders:
    -
        map: 'C:\Users\Keith\Code\swellphp\admiral'
        to: /home/vagrant/code
# sites:
#    -
#       map: homestead.test
#       to: /home/vagrant/code/public
# databases:
#    - homestead
name: admiral
hostname: admiral
# Installs the box.
$ vagrant up

# Ssh into it.
$ vagrant ssh

# Cd into the working directory.
$ cd code
Setting up Git
Now I want to fork the
swellphp/admiral repository so that I don't work directly on the official code base. I simply navigate to the swellphp/admiral repository page on GitHub and click the fork button, select my account and voila, I have the forked repository under keithmifsud/admiral.I now need to add both the main repository and the fork to my local git. The official repository will be named as "upstream" whilst the fork will be "origin". I also configure git's author so that the commits are linked to me on GitHub
# Initialises git.
$ git init

# Adds the upstream remote.
$ git remote add upstream git@github.com:swellphp/admiral.git

# Adds the origin remote (my fork).
$ git remote add origin git@github.com:keithmifsud/admiral.git

# Pulls the contents from upstream.
$ git pull upstream master

# Configure git.
$ git config --global --edit

# I change the name and email, save and close.

Ctrl+x Y

# Consolidates the local and remote files.
$ git add .

# Note the "GH-1" in the commit message, this links the commit with the issue on GitHub.
$ git commit -m "GH-1 Initial commit"
With the first commit out of the way I set up my local branches by first checking out a new "develop" branch which will hold my local changes, then I checkout my first feature branch which I name the same as the issue key on GitHub, in this case "GH-1". Using feature branches and naming them the same as the issue at hand keeps everything organised and also GitHub will mention the commits on the issue page making it easier for future reference. Further to this, the feature branching model enforces us to segregate all responsibilities in the code itself.
# Checksout a new develop branch.
$ git checkout -b develop

# Checksout the new feature branch.
$ git checkout -b GH-1
Next, I like to take care of protecting my upstream master branch and forcing contributors to request to merge their contributions, including myself. This is quite straight forward to do. From the
swellphp/admiral repository, I navigate to settings, then in branches, under protected branches I select the master branch and at the very least select "Protect this branch" and "Include administrators". What this does is forces any pull requests to be reviewed before merging into the master branch of the upstream repository. It also protects the branch from being deleted.Setting up the IDE
Ok, so we have a vagrant box running, we have git setup locally and remotely, what's next? Setting up the IDE! I use (and you should as well) PhpStorm. My PhpStorm is very well configured already but I still have to do a few things on every project. First and foremost, I add the project to the IDE ... obviously! 😊
Then I rename the project, in our case, "SwellPhp Admiral". This is because I have my DocBlocks configured to automatically retrieve the project's name from PhpStorm and PhpStorm defaults the project name to name of the directory which is all in lowercase and we don't like that, do we? 😊
An important setting in PhpStorm is to configure the Php interpreter so that it uses the one from our vagrant box. I consider this setting very important, especially now, with all the differences in PHP versions. PhpStorm will tell you if for example you use features only available in Php7.1 when your interpreter is set to Php 7.0.
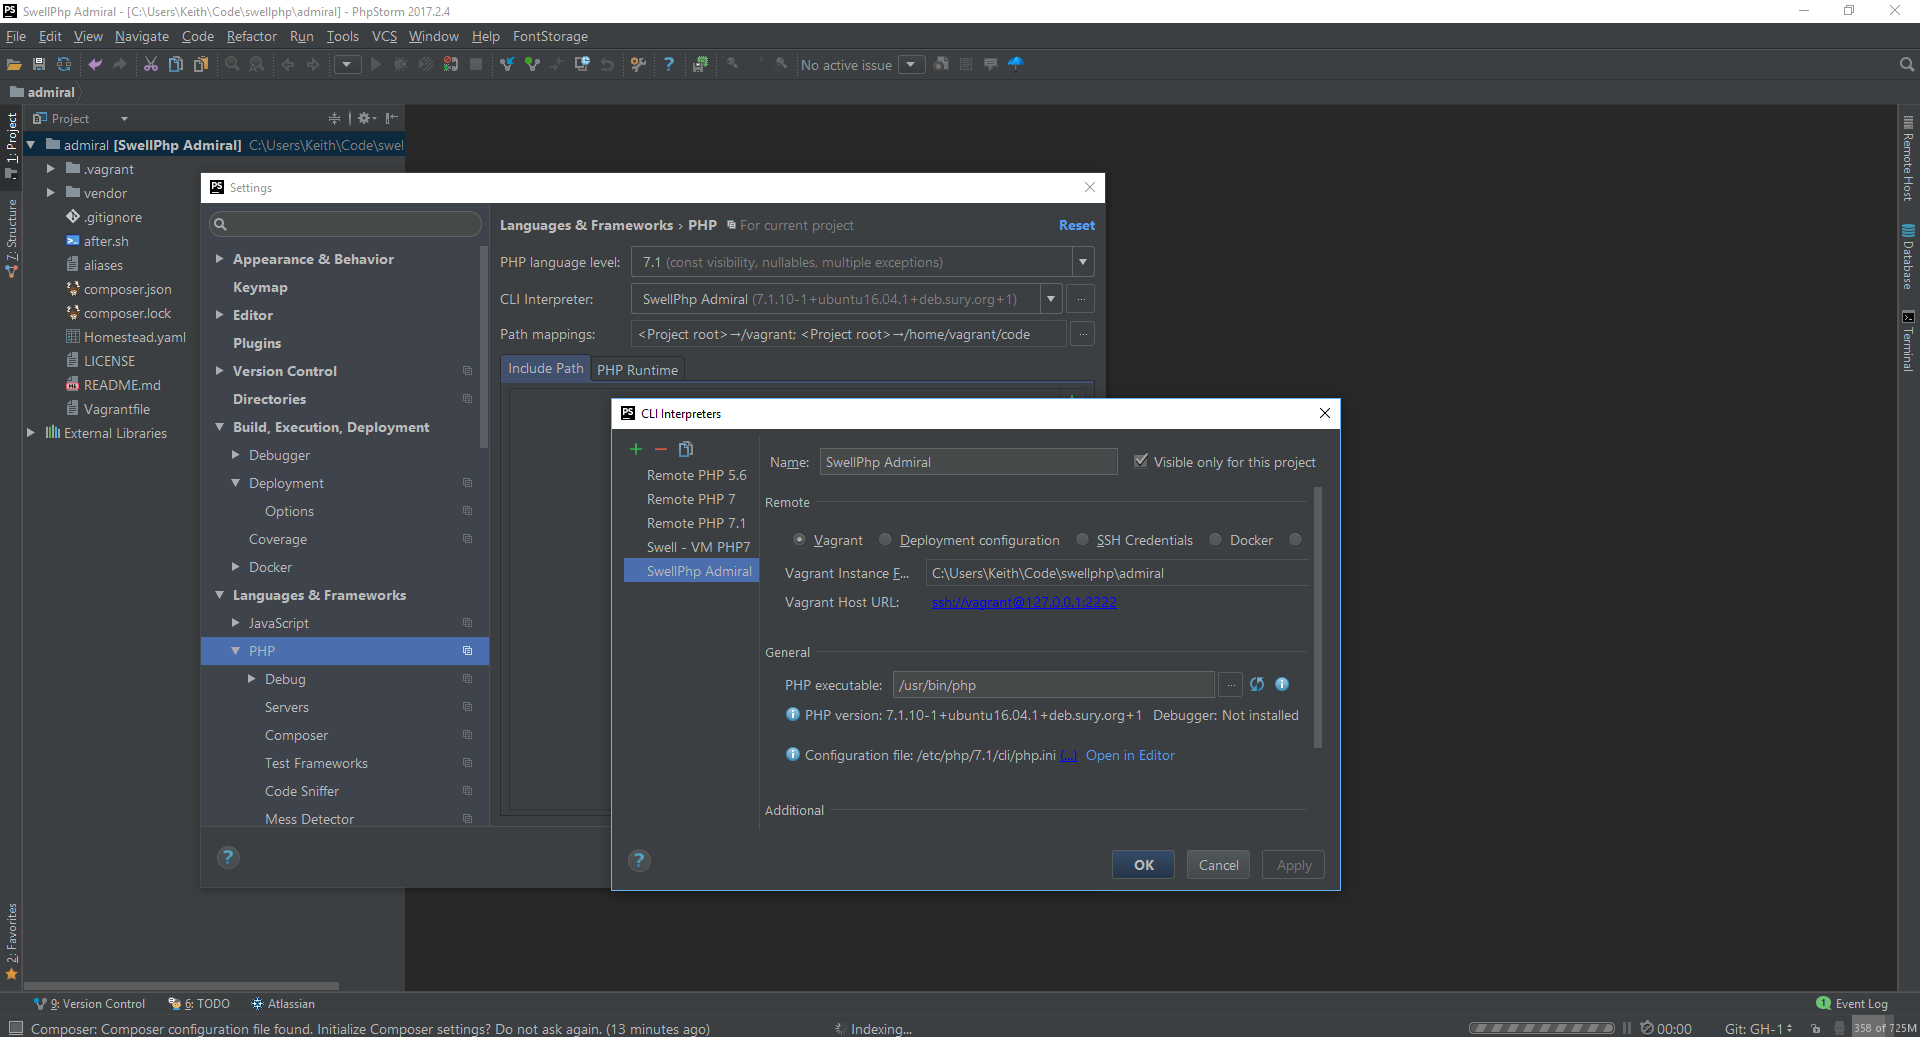
Later on in the project I will also need to configure some directory settings so that PhpStorm will automatically populate the namespaces etc.. when I create new classes using the preconfigured templates.
The Composer.json file
The next step is to configure the
composer.json file so that this library can be installed from Packigist.org. Since we already have this file with the Homestead development dependency, we simply need to edit it like so:{
"name": "swellphp/admiral",
"description": "A PHP Command Bus with Command Handling",
"type": "library",
"keywords": [
"swellphp",
"swellphp admiral",
"admiral",
"command bus",
"cqrs"
],
"license": "MIT",
"require": {
"php": ">=7.1"
},
"require-dev": {
"laravel/homestead": "^7.0",
"phpunit/phpunit": "~5.0"
},
"autoload": {
"classmap": [
],
"psr-4": {
"SwellPhp\\Admiral\\": "src/Admiral/"
}
},
"autoload-dev": {
"psr-4": {
"SwellPhp\\Admiral\\Test\\": "tests/Admiral/"
}
},
"config": {
"preferred-install": "dist"
}
}
You'll notice I added the php version as a requirement and also phpunit as a development requirement so we'll need to update composer:
# Updates the composer dependencies.
$ composer update
The Readme File
Since we will deploy this package to Packagist.org without it having anything useful, we should state so in our
Readme.md file. So let's go ahead and add some preliminary information:
# Admiral by SwellPhp

Code repository for Admiral, a PHP Command Bus with Command Handling abilities.

## Under Development

Please note that this library is under initial development and it's not recommended for anyone to use in any scenario except for testing, development and learning.

Please visit [Developing a Command Bus in PHP](https://keith-mifsud.me/developing-a-command-bus-in-php) for more information.

## Installation

Install via composer:

`composer require swellphp/admiral`

## Documentation

Usage documentation will be provided soon.

## Contributing

Public contributions will be available soon and guidelines will be updated here when applicable.

## License

Licensed under the MIT license [LICENSE FILE](LICENSE).

## Copyright

As per the creative commons community, copyright is reserved to the author(s).
Setting up the library on Packagist
Before we can submit the code files to Packagist, we need to commit our changes and merge them to the source so that our
composer.json file can be picked up by Packagist. It's also a good idea to check the .gitignore file at this stage and make sure that if using PhpStorm, to exclude the .idea directory so that it does not conflict with the ones from other developers, resulting in the loss of their IDE settings and preferences. My file looks like this:# .gitignore
/vendor/
.idea
.vagrant
# Adds the files to git.
$ git add .

# Commits the changes.
$ git commit -m "GH-1 Udated composer.json, Readme.md and .gitignore"

# Although there's no changes from anyone else, I still follow this procedure
# so that it remains a habit.

# Checkout the develop branch and pulls any changes.
$ git checkout develop
$ git merge upstream master

# Merge our changes and pushes them to our origin develop.
$ git merge GH-1
$ git push origin develop
Then from GitHub, I submit a pull request to the upstream master branch and I must approve it manually for the changes to be merged as we have previously protected this branch.
Assuming you already have an account on Packagist, you can easily submit the package. Just click the "Submit" link from the top navigation and enter the repository url which in our case is
https://github.com/swellphp/admiral, click check followed by submit.Following this, we want the package to automatically update with our changes whenever we merge them into the upstream code. For this we need to set up a hook on GitHub. This is also quite easy, all is needed is to access the settings page of
swellphp/admiral, under the "Integration & services" tab, click on "Add service" and select "Packagist" from the list of available services. Then enter your Packagist username NOT the vendor name. In my case this is "keithmifsud" and not "swellphp". Then copy the API token from your Packagist profile into the Token field in GitHub and click "Add Service". Once done, click on the "Edit" button and then click "Test Service". If all goes well, all merges to upstream will be reflected on Packagist automatically.Now everyone can install this package by simply requiring it via composer
composer require swellphp/admiral.Reorganise
We're almost done 😊 All we need to do is get reorganised so that we're all ready to pick this up again next time. First of all let's close the GH-1 issue from the Kanban board. Then we can delete the GH-1 branch from our local Git as this is now merged and deployed.
# We're still in develop branch.
$ git merge upstream/master # all is up to date because I'm the only one working here.
$ git branch -d GH-1
Did anyone notice, that we already have some undocumented backlog tasks? One to create documentation and another to prepare the contribution guidelines, We promised our users we'll provide these in the
Readme file. We can simply create Cards on our Kanban board for these tasks so that we don't have to remember anything until needed.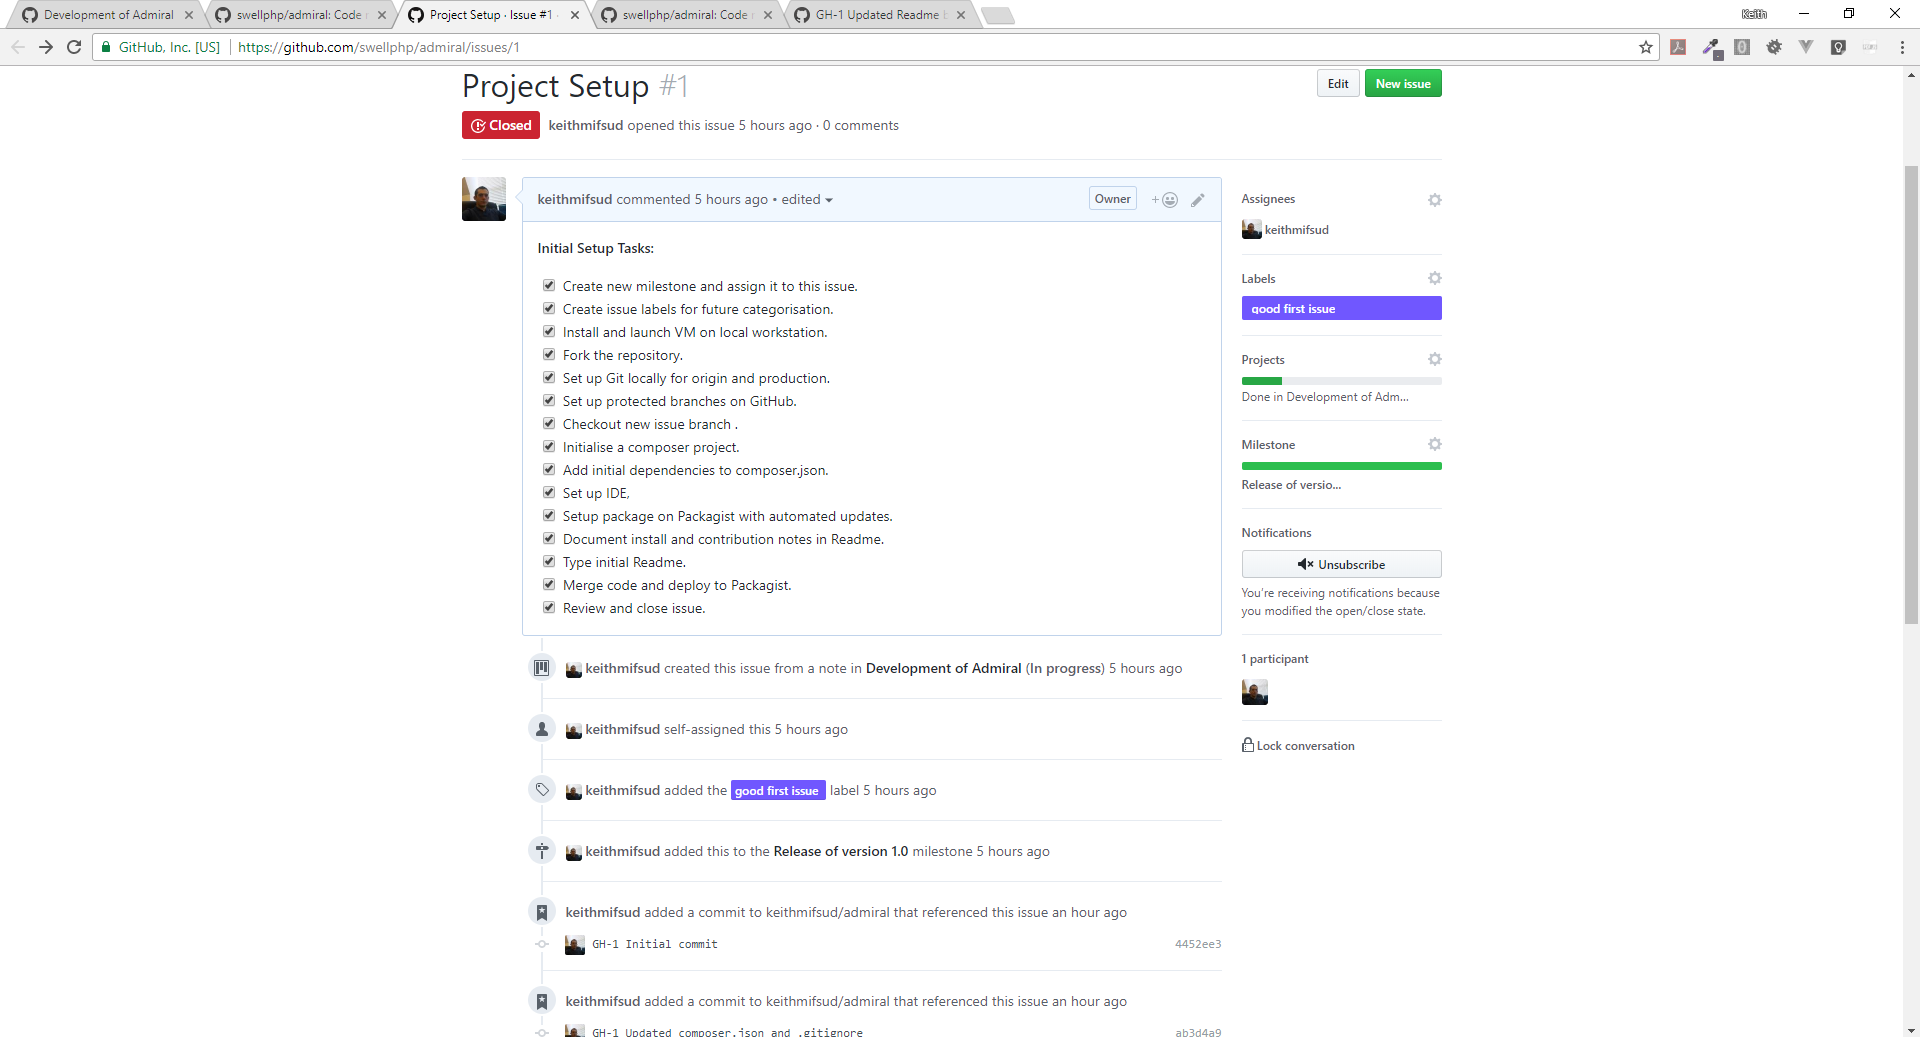
Now we're done
This was quite a long read, wasn't it? I hope that this post will be useful to anyone wanting to start a new PHP library or any PHP project for that matter. In the next post we will start programming the actual library with a Test Driven Development (TDD) approach so until then, feel free to ask me any questions in the comments below and subscribe to the email newsletter to ensure you're notified as soon as the next post is published 😊
2019 Update: I now generally use Docker Containers instead of Virtual Machines for development. Read my more recent article about getting the technology stack ready for your application here.
